
The Importance of Vapor Barrier Installation
In the realm of home maintenance and construction, understanding the significance of Vapor Barrier Installation is paramount. A vapor barrier serves as the frontline defense against moisture intrusion in your home’s crawl spaces and basements. As environmental factors continually shift, the need for effective moisture management becomes critical to enhance the durability of structures and improve indoor air quality.
Understanding Vapor Barriers
A vapor barrier is a material designed to resist the passage of moisture. Typically composed of polyethylene film, it can vary in thickness and is installed on the ground in crawl spaces or basements, as well as along walls to prevent moisture from the ground or humidity in the air from penetrating living spaces. There are different types of vapor barriers, categorized mostly by their permeability levels, which dictates how much moisture they allow to pass through. A low-permeability barrier is ideal in humid climates, whereas a high-permeability solution may suffice in arid regions. The choice of material is essential based on local environmental conditions.
Health and Safety Benefits
Beyond structural integrity, vapor barrier installation is crucial for health and safety. Moisture accumulation fosters the growth of mold and mildew, which can lead to serious respiratory problems and allergies. Additionally, excess moisture can attract pests, such as termites and rodents, that pose risks to both the house and its inhabitants. By installing a vapor barrier, homeowners can significantly diminish these risks, thus promoting a healthier living environment.
Cost-Effectiveness for Homeowners
While the initial cost of vapor barrier installation might seem an expense for homeowners, the long-term savings can be substantial. By minimizing moisture-related issues, such as mold remediation and structural repairs due to water damage, homeowners can save thousands over time. Additionally, improved indoor air quality can lead to reduced health care costs associated with allergy and asthma treatments. Therefore, considering vapor barrier installation as a preventative measure can yield significant financial benefits, enhancing the overall value of a home.
Materials Used in Vapor Barrier Installation
Choosing the Right Materials
When selecting materials for vapor barrier installation, it is essential to consider their characteristics, performance, and suitability to your specific environment. Polyethylene is the most common choice due to its durability, resistance to moisture, and cost-effectiveness. However, there are also reinforced vapor barriers made from various blends, which provide superior strength and tear resistance, making them ideal for high-traffic areas. It’s also important to choose materials that conform to regional building codes for vapor barriers, which might mandate specific thicknesses and types of barriers based on local climate conditions.
Comparing Thickness and Durability
Vapor barriers come in various thicknesses commonly measured in mils (one mil equals one-thousandth of an inch). Thicker barriers, such as those around 10-20 mils, offer enhanced durability and resistance to punctures compared to thinner options. In areas prone to heavy foot traffic or where heavy equipment may pass, opting for a thicker barrier can prevent premature wear and leaks. Additionally, when considering longevity, its essential to invest in UV-resistant materials if the installation will be exposed to sunlight.
Environmental Impact of Materials
While polyethylenes are widely used due to their effectiveness, it’s important to consider their environmental impact. Some eco-friendly alternatives, such as vapor barriers made from recycled materials or those designed to be biodegradable, are increasingly available. These materials are not only effective but also contribute to sustainable construction practices. Homeowners should weigh the short-term performance versus the long-term environmental ramifications of their choices during vapor barrier installation.
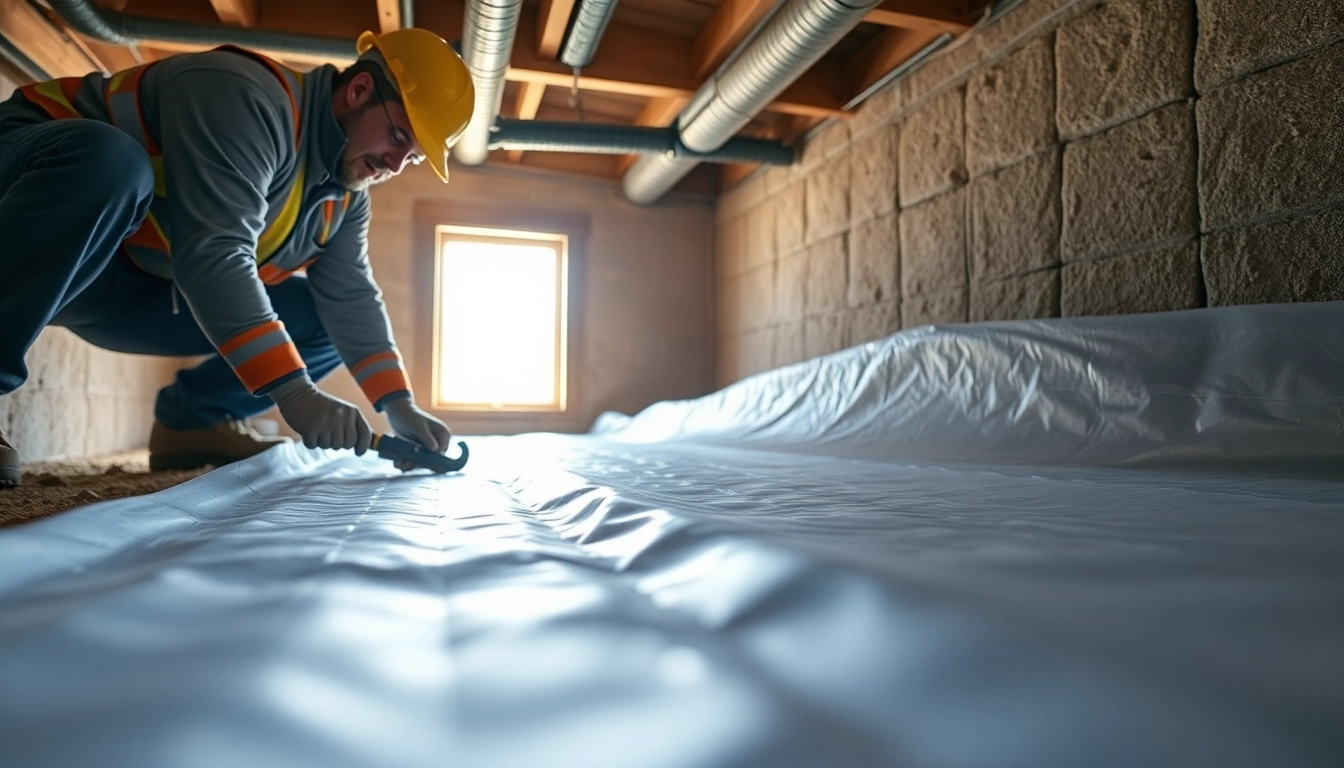
Steps for Effective Vapor Barrier Installation
Preparing the Area
Proper preparation is critical for the success of vapor barrier installation. Begin by clearing the area of any debris, sharp objects, or vegetation that could damage the barrier. Next, inspect the existing drainage systems to ensure adequate moisture control in the crawl spaces or basements. It may also be beneficial to conduct a moisture test on the ground surface to assess the level of humidity and moisture presence before proceeding. Lastly, ensure the area is adequately ventilated and dry before installation.
Installation Techniques
The installation of a vapor barrier is relatively straightforward, but adherence to specific techniques is paramount for optimal effectiveness. Lay the barrier flat across the ground, overlapping seams by at least 12 inches to prevent moisture from seeping through joins. Use strong adhesive tape designed for vapor barriers to secure seams, ensuring a tight seal. If installing along walls, extend the barrier up at least 6 inches above the ground level and fasten it securely to wall surfaces. Ensure that any penetrations, such as pipes or wiring, are sealed with appropriate materials to maintain integrity.
Post-Installation Inspection
Once installed, a thorough post-installation inspection is vital. Check all seams and joints to confirm they are sealed properly, and examine for any visible gaps or damages. A moisture meter can be used to measure humidity levels under the barrier to ensure that it effectively blocks moisture permeation. Additionally, implementing a regular inspection routine can help in early detection of potential issues, ensuring the vapor barrier continues to function effectively over time.
Common Challenges in Vapor Barrier Installation
Identifying Moisture Sources
One of the biggest challenges faced during vapor barrier installation is accurately identifying moisture sources. It is crucial to diagnose whether moisture is entering from the ground, the walls, or through air leaks. Techniques such as thermal imaging or moisture detectors can be helpful in pinpointing these sources accurately. Owners must address these issues before barrier installation; otherwise, all efforts could be in vain as moisture continues to invade the space despite the installation.
Dealing with Uneven Surface Conditions
Another common challenge is the installation of vapor barriers on uneven surfaces. Uneven terrain can create gaps, leading to inefficient moisture control. In such scenarios, homeowners may need to consider measures such as leveling the ground or utilizing thicker vapor barriers that can adapt better to surface irregularities. While it may require extra effort and planning, ensuring an even foundation will significantly enhance the barrier’s efficacy.
Addressing DIY Errors
Many homeowners opt to install vapor barriers themselves, which can lead to common DIY errors. Inadequate sealing of joints and seams, poor placement, or neglecting moisture trapping issues can undermine the effectiveness of the installation. To mitigate these issues, it’s beneficial to follow manufacturer guidelines thoroughly and, when necessary, consult experts. Ensuring that the application is done right the first time can save homeowners time and money in the long run.
Future Considerations After Vapor Barrier Installation
Maintenance Tips
Post-installation maintenance is crucial for ensuring the long-term performance of your vapor barrier. Regular inspections at least once per year should be conducted to look for signs of damage, mold growth, or moisture. Clear away any debris to prevent punctures and keep the area around the barrier dry. Keeping track of humidity levels using hygrometers can also help maintain a suitable environment under your barrier.
Long-Term Monitoring for Effectiveness
Long-term monitoring for vapor barrier effectiveness involves ensuring that the installed barrier continues to perform its function over the years. This includes ongoing checks for moisture accumulation, ensuring peripheral drainage systems function properly, and upgrading insulation to minimize condensation. By routinely checking performance indicators, homeowners can prolong the useful life of the vapor barrier.
Upgrading Your Home’s Moisture Control
Recognizing that moisture management is an ongoing process, homeowners may consider upgrading comprehensive moisture control strategies post-installation. Options include enhanced drainage systems, improved ventilation solutions, or integrating advanced dehumidifiers. Implementing these alternatives can provide a holistic approach to moisture management and contribute positively to the overall indoor air quality.
Frequently Asked Questions
What is a vapor barrier?
A vapor barrier is a material designed to impede moisture movement into structures, commonly made from polyethylene film.
How much does it cost to install a vapor barrier?
The cost to install a vapor barrier can vary significantly based on the size of the area and the materials used, but it typically ranges from a few hundred to several thousand dollars.
Can I install a vapor barrier myself?
While some homeowners may attempt DIY installation, careful planning and adherence to guidelines are critical for effectiveness. Consider consulting a professional for optimal results.
How do I know if my vapor barrier is working?
Regular inspections for signs of moisture, mold, or dampness, in addition to monitoring humidity levels, are effective ways to gauge a vapor barrier’s performance.
What materials are best for vapor barriers?
High-density polyethylene is often the best choice due to its durability; however, eco-friendly alternatives can also be effective while minimizing environmental impact.